lauantai 18. kesäkuuta 2011

Butterflies

So I really have no idea how I came up with these, I just closed my eyes one day and saw this image of my nails, and so I kept them in mind and decided to try them. They didn't turn out quite as well as I had imagined though, but they're ok :D
So here's what I started off with, a pink stripe in the middle and gold on each side.
 I then painted three stripes with black nail polish and a very thin paint brush.
 After this I used Konad's plate no. 25 and bm 05 to do the butterflies. The only problem was that the butterflies sort of looked like they were caged in since the stripes were stronger than the printed images, but oh well, they came out ok anyways :)

Crosses and flowers

These nails look nice and are very easy to achieve :) It would've looked nicer to have a lighter pink nail polish underneath but I don't have one :/ another good option would be white too. I used plates bm 11 and 17 for the middle and ring finger, bm 21 for the second finger and the pinky, and bm 20 for the thumb. I used Wet'n'Wild's black creme for the prints. I added a little extra by adding some rhinestones on the second finger as you can see below, which I thought was a nice extra touch :)


 I also did my mom's nails :D you can see them down below, I painted the base with a purplis/pink called candy pink by Mavala, and on top printed this white flower pattern from plate bm 16. I added a rhinestone on the fourth finger in the middle of the flower which you can see, which always adds a little extra to the look :)

torstai 16. kesäkuuta 2011

Water marbling!

 So I tried out water marbling, I tried it once a long time ago but since it didn't work out I thought I was doing it wrong, but I wasn't, probably just using the wrong kinds of nail polishes :D So here you can see all the equipment I used, an assortment of nail polishes I used, a cup filled with water, and orange stick and a pin and of course some paper to wipe the orange stick on ;P
 So basically you just drop drops of nail polish onto the surface of the water, it's very easy and gives very beautiful results! After you get the amount of rings you want just take a tooth pick or a dotting tool (a pin in my case) and draw lines across the surface of the water through the nail polish. Just be careful because the nail polish tends to want to stick to the object you're dragging through it. There are very many options as in how to draw the pattern, with this one I drew lines first vertically and then horizontally, making a very.... funky pattern :D
I then dipped all these four nails into the pattern (being a lazy person). Usually people just do one at a time, and it would probably yield much better results, but I didn't want to use all that time so I just dipped them all in :D That's why not all the nails came out so nice... oh well! Now people always say that once you dip the nail in you should gather the excess polish off the surface of  the water with your orange stick but I didn't really need to, most of the pattern was taken up since I did all my fingers at the same time :D (though I did do my thumbs separately)
 Here's the result after I cleaned up, I think marbling looks so nice and I will definitely do it again! Except that next time I guess I'll not be so hasty and try and get better results :D

Foil nail art! - Cherry O's

So I ordered a bunch of stuff from the Dollar Nail Art store and they finally came! Not that the delivery took long, it was pretty quick actually, but since I was looking forward to them so eagerly it seemed like a long wait ;P So I ordered seven different nail foils, the one I tried on now, a gold, silver, fuchsia, marble, a rose pattern and a marble pattern. I'll try them all on and post about them later on one by one :) I also ordered striping tape and rhinestones and stuff but those you'll probably see me using in other nail art I do :D sorry about all the smileys, i'm just excited about these ;P
So below are all the equipment I used, not including the nail polishes though, which were a base coat and a dark red nail polish.
 So here was my first trial, not very successful, but luckily the second time I tried it already came out much better, I don't think I let the adhesive dry well enough.
 I decided to put a coat of red nail polish underneath to help hide any small mistakes when the foil doesn't always stick to every single part of the nail. Below you can see the red nail polish and I've just added adhesive  to my thumb, this is what it looks like when you first put it on, it later dries and becomes tacky and see through, you can't even notice it on the nail.
 I then cut the foils into suitable sizes for each finger; I just estimated and cut ten pieces of the foil, each approximately a few centimeters wide. The you just stick it to the nail and rub it down, I used an orange stick to press it down and get all the edges near my cuticles.
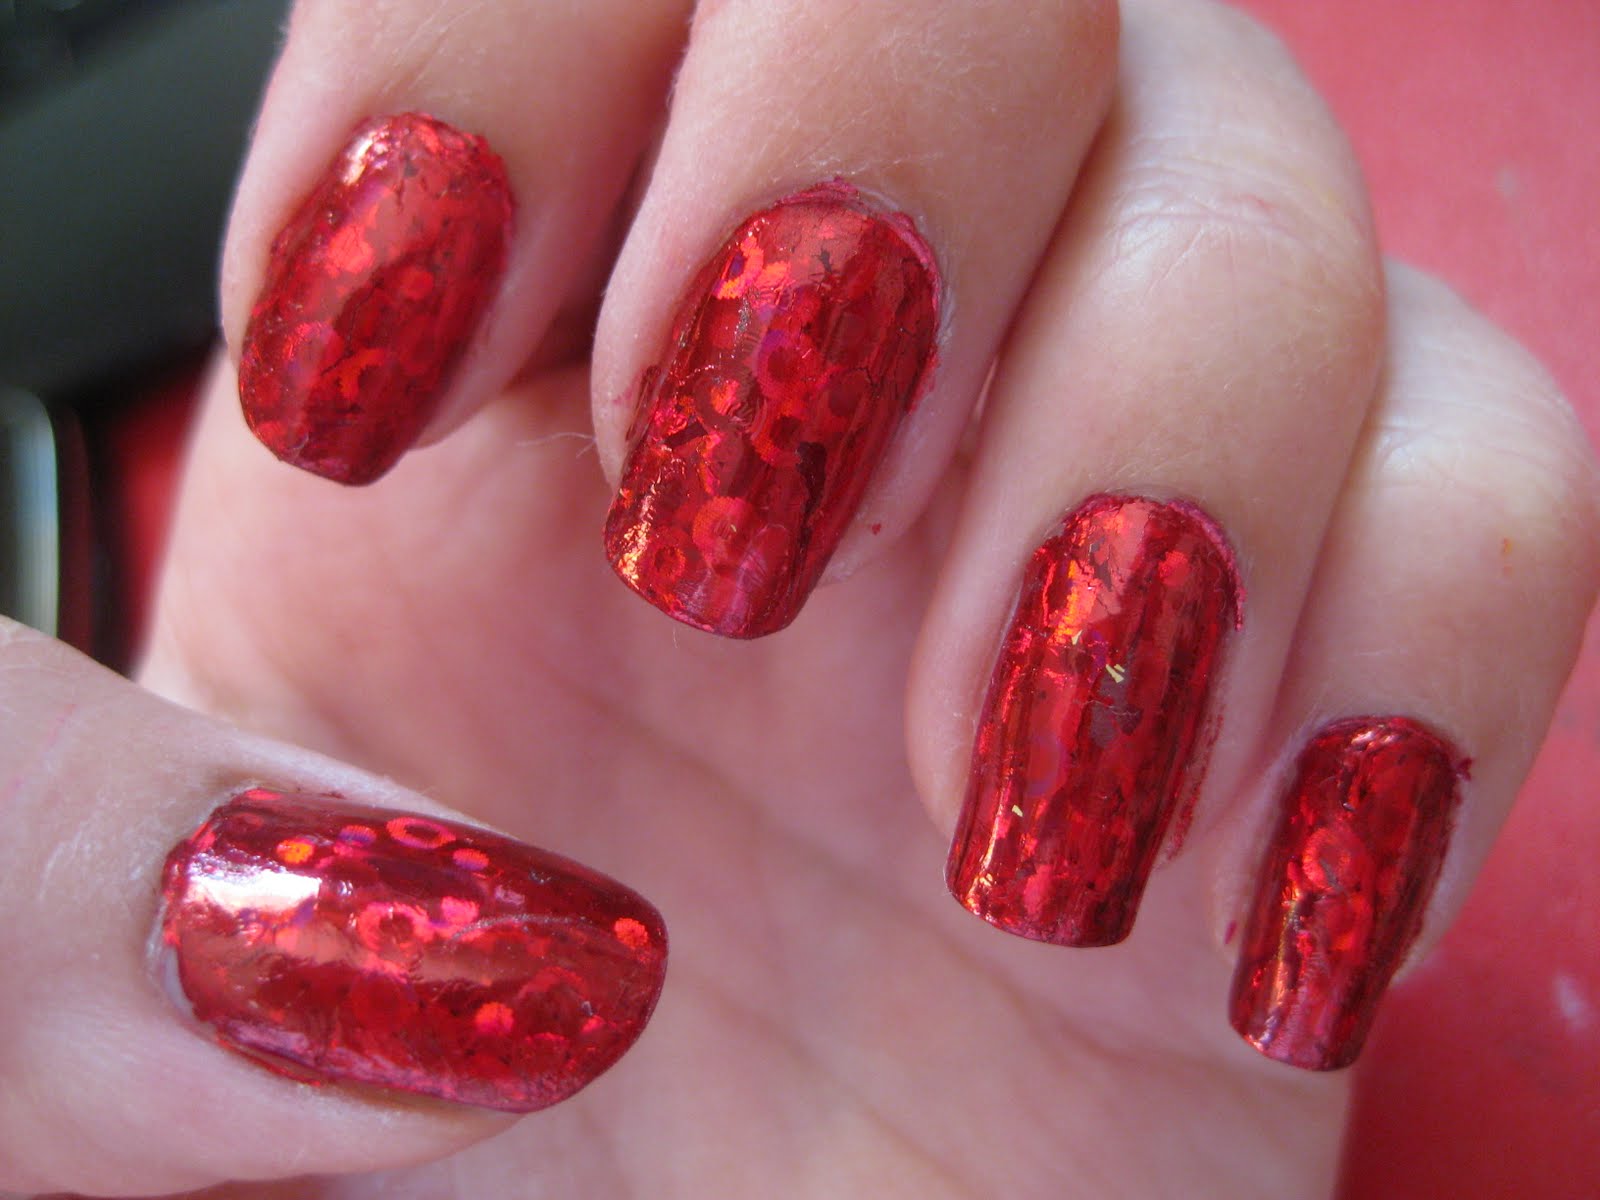
Now the result didn't come out perfect but good enough for me! I'm not striving for perfection, just having fun and getting cool looking nails at the same time :)

 Here I added some of the striping tape and a rhinestone on the ring finger, even though it looks nice in my opinion this look is a bit too dark for me, I don't know why silver makes it look dark, it just does, a bit gothic maybe :D so for me it would have been better without the added decorations since i'm more of a colourful-liking person (if that's even a word) :D
Enjoy! It's very easy once you get the hang of it :) (and I can't wait to try out the rest of the foils!)

Silver and White

So here I started off with a silver coat of Aurezia's Magnifique, anything else I couldn't make out because it was all in a foreign language :D but I really like the colour because it's very shimmery and actually looks like a mixture of silver and gold when it dries, depending on the lighting.
 After this I used bm 21 to print the design onto three out of five nails on each hand, I just chose random nails. Below you can see the right and left hand.

 My sister gave me some rhinestones stickers which she had left over so I decided to use them today. And finished with a top coat and that was it, very simple! :) I liked this look because it was a fancy, yet moderate look which would suit and fancy occasion :D

tiistai 14. kesäkuuta 2011

Acrylic paints

So I found these acrylic paints we have and just decided to try them, I checked on the internet and many ppl said that you can paint with acrylic paint on your nails. There's also acrylic nail paint or something but since I have these here I just wanted to test them out :) What sucked was that the white had dried out :/ So the nail with black and purple was supposed to come out as a black base and white flower on top but I had to change the plan. Basically I only liked my thumb and third finger. Red and black is too dark for me, the pink and yellow sorta failed, the yellow wasn't a very strong colour, sort of see through, and it came out looking weird.
 The thumb was my favourite :)

And here's the other hand :) In the end I probably won't be using these acrylic paints again on my nails, even though they were very easy to paint with (I used these tiny little brushed I found) they weren't very shiny and looked like paint on paper, not nail polish like, which is actually pretty obvious ;D

perjantai 10. kesäkuuta 2011

Fimo fruit!

I really liked these nails, I thought they were very cute :) So basically I did a very long french manicure, I didn't bother cleaning up the smiley line because the fruit would come on top anyways. In this first picture you can see how I kept the fruit in place, since I didn't use nail glue, I just painted the bottom of the fruit with nail polish, holding it with tweezers, and then put it in place. Once I had all the fruits I wanted on the nail I wrapped my finger with a small elastic hair band do the they would dry well into place. Usually the fimo fruit have fallen off pretty quickly but with this method of pressing them down they stayed on for a longer time.
 This was my favourite nail :)
 After I took off the hair bands (which I kept on for a few minutes by which time my fingers had partially turned black hehe) I added a clear polish with gold glitter in in it on top of the white nail polish.


Flowers on gold - fail

Yeah these nails didn't come out quite as I had wanted to... My idea was to rim the white flowers I did with my Konad image plate with green, it went well until I actually started outlining the flowers with green. I used a toothpick and so the process was very slow and frustrating. The lines came out wired and wobbly because it was hard to outline such a small image, on top of that I soon got bored since I had to outline six flowers on each finger so I ended up just rushing most of them. The outcome wasn't looking too good anyways so I didn't really care :D Since I didn't want every nail to look the same I printed butterflies on the fourth finger and outliuned them in black. This turned out looking a bit better than the flowers did, luckily :)

tiistai 7. kesäkuuta 2011

French manicure + roses

This time I just did a basic french manicure and added some rose stickers I had left over :) I also added a glittery top coat just to add something extra to the look, on the second picture I had added a ribbon which I thought was pretty cute, the only thing was that it came off on the same evening because it wasn't sticking to my nail very well :/


sunnuntai 5. kesäkuuta 2011

Cherry blossoms

I decided to hand-paint my nails after a while of Konading/using bundle monsters :) I notived how nice our cherry tree was looking in our garden and wanted to do a cherry blossom inspired look. It doesn't really resemble the tree a lot I guess but it's what inspired me. I started off with a gradient of pink and yellow which turned out pretty nice I think. I painted my nails yellow with Ruby Kisses' Yellow Bikini, and on top I used Maybelline's Water Shine no. 03.
After this I took  a reeeally thin paint brush and painted the branches with Wet'n'Wild's Black Creme. It was pretty easy and I like how it turned out.
 After this I painted on white flowers using the brush again, which after I just put tiny red dot's in the middle using a toothpick. Toothpick's often come in very handy so I always have a package where I keep my nail things.

 I also added on a coat of Anytime's Sparkling fizz, no. 18. I really like it because it adds a bit of glitter and glam to the look without being too strong.
 Here's our cherry tree! Just thought it would be a nice idea to actually take a pic with my nails and the cherry tree that inspired me :)

perjantai 3. kesäkuuta 2011

White and glitter

At first I was going to do some kind of a french manicure but I figured my nails weren't quite long enough so I did these instead :) So here's the first step, basically I just painted half o the nail white, curving slightly. Personally I didn't use a guide or anything, which could also come in handy here I guess, I just don't like using them :D
 After this I waited for the white to dry properly then painted another similar stripe on the top of my nail (the area with the pink glitter) with a random see-through nail polish and dipped it in pink glitter. After this I just added a few stickers which I never use, so I decided to use some of them this time! I finished off with mavala's quick dry top coat and voila, done :)


These were nails I did for my little sister, they didn't come out that nice because her nails were so small it was hard to use Konad's printing system and for some reason I find it very difficult to do other people's nails :D The idea here was to only have the print on half the nail and rim it with gold glitter. The gold sin't very visible in this picture but it's there :) to get the print on only half the nail I just covered the part I didn't want the print to be on with tape, simple :D